A couple of posts ago, I mentioned I would be branching out to other topics. Although this one may seem like a stretch, after my review I will tell you how I got the light trail shot below. So this is a double bonus blog, a great gift suggestion and some photo tips.

If you are looking for a fun and entertaining gift that will make the whole family smile. Look no further than the Estes Proto-X Nano Quadcopter. This is perfect indoor entertainment for anyone 10+.

I have always wanted to get into drone photography, but flying one can be a challenge and I have never wanted to take the jump and invest in a $1,000 system to inevitably crash it on its first flight. My son had a gift certificate for our local hobby store, Everything Hobby, and we stopped in a couple of weeks ago and the perfect thing jumped out at him, this little drone. Perfect, I thought, Junior could become my future drone pilot.
Since this is a micro quad, I have a micro review. I am sure there are others reviews with every technical detail covered, but I am more thumbs up or thumbs down and this is unquestionably a thumbs up toy.

This quadcopter measures about 2.5” long and comes in a variety of colors. Everything you need is in the box, even a set of spare blades. The transmitter requires 2 AAA batteries. The drone itself is charged via an included USB cable. I found that charging was faster, about 15 minutes, when using a wall adapter versus a computer connection.
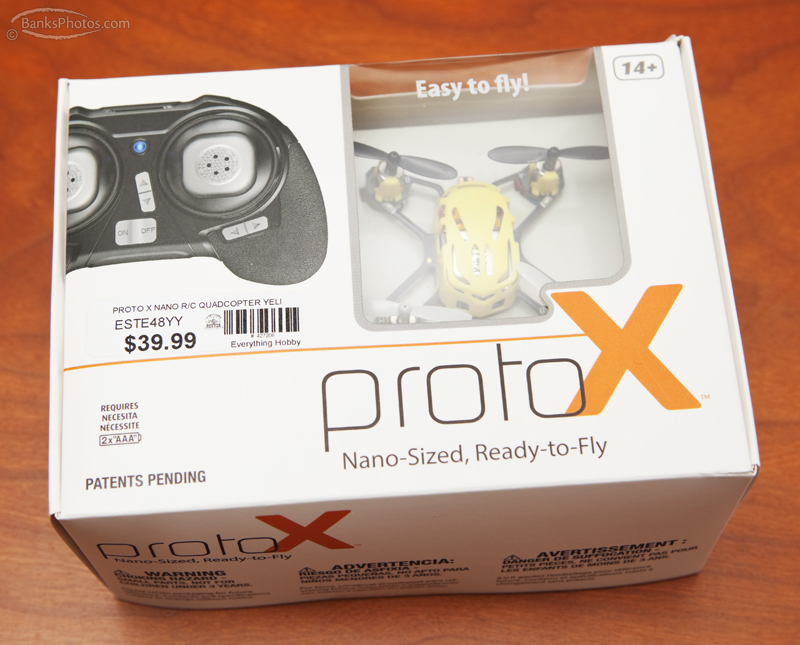
The instructions are a quick read, which I recommend before your first flight. This quad is small enough to fly in a living room and after a little practice with a bounce off a few walls and the ceiling you can control it with ease. The transmitter has controls for Up/Down, Forward/Back, Rotate and Left/Right. Rotate allows the quad to spin on its center axis which adds a nice touch of variety. If the quad drifts the transmitter has trim functions to adjust flight direction or maintain a hover.
This little thing is durable, ours has survived a few nasty crashes and its built to handle accidents. The rotors are designed to pop off with a bad collision. If more than one comes off, or you want to replace a chipped or damaged blade, there are letters A and B on each blade. These letters are very tiny and very hard to see, yet very important when replacing the blade. A and B are also marked on the frame, the corresponding rotor must be placed on the proper motor.

The LED lights at all four motors and the front add to the fun, the lights flash when the battery is getting weak, indicating it's time for a charge. Overall flight time per charge, is a little short, at about four minutes, but in about 15 minutes of charging and you will be flying again.
Overall, this is just a fun toy, almost like piloting a humming insect and will make a great gift.
There are two other models, I am excited to try. The Proto-X SLT has a few more features and the ability to flip for only $10.00 more. The Proto-X FPV is a big jump in price but includes a HD camera with a screen on the transmitter for a first-person view.
Where to Buy
Everything Hobby – Brick and Mortar store in Rochester and Austin, Minn.
Tower Hobbies – Online store with all three versions available
How I got the Shot

This photo, a crop of the one at the beginning of this post, is straight out of the camera and is the result of more luck than skill. This was a collaborative effort between my son, the pilot, and me, the camera and flash operator. This was shot in our dark living room, with all light sources turned off.
I used a Canon 5D Mark II and 24-70 lens on a tripod. I chose to use a cable release and mirror lock-up to eliminate any camera movement. My ISO was 160 for low noise, this is a five second exposure at f/9. The LEDs on the quad are quite bright, so f/9 allowed the lights to nicely streak while keeping the room dark and provide adequate depth-of-field.
To freeze and illuminate the quad, I used a studio strobe (Alien Bee Einstein) mounted on a light stand to the left and above the camera, firing down and to the right. The Einstein, on low power, is capable of freezing fast objects, so I had the power at about half so the rotors were not frozen.
Here is where the luck comes in. With the room lights on, the lens was prefocused about four feet out and switched to manual so it did not try to focus when the action began. I turned the lights off and my son fired up the quad. He tried to fly unique patterns in front of the lens. I triggered the cable release with my right hand and when I guessed the quad was in the right position I used the test button on the strobe to fire the flash. We went though a few quad charges and flights, I got a number of good photos, many bad ones but this one just worked.
You would not need a studio strobe to replicate this look. However, you will need an off camera flash of some type, a hand held Speedlite should work fine. You will need some patience and a little luck, but if you want to try this, I hope I have provided a little background info. Good luck and I would love to see your attempts.