Brinno Time Lapse - House Construction Project Final Video

2019 UPDATE: If you want an amazing new long term time lapse construction camera, please check out the Afidus ATL-200 at www.AfidusCam.com. We also have a web site dedicated to sales and support of time lapse cameras at www.TimeLapseCameras.com. Customer care is very important to us and we are here to ensure your time lapse project is a success.


I temporarily dropped the ball with my blog updates to concentrate on the new www.BrinnoUSA.com web site which is coming along quite well. More on that later, now back to my ongoing projects.

Here is the end result of a seven month house construction project started in March, 2014. Select 720 with the gear icon, in the player, for the best quality.

Originally, this was going to be a shorter video. However, we decided to have the video playing at the Parade of Homes show and a local builder's show. We wanted the movie to engage people without overwhelming. As it turned out, people stand around just to watch the action,  the video is a great ice breaker and draws people in.

The one disappointment, for me, was the mount. I placed the camera on top of a fiberglass street light pole which must have expanded and contracted throughout the day causing the view to shift slightly.

Various aspects of this project were highlighted in previous posts...

Brinno Time Lapse - House Construction Cam First Download

Brinno Time Lapse - Breaking Rule 1

I used the Brinno TLC 200 f1.2 camera which is now bundled as a complete package with weather resistant housing, the Brinno BCC100 Construction Cam. Capture was one frame every 10 minutes and the camera timer was set for working hours only.

Using the timer, a new AVI file was created every day. In editing, the files were combined, uneventful portions removed and music and text were added. This whole process is something most anyone could accomplish, the editing can be time consuming but we are very willing to provide editing services if you want help creating a polished video.

The camera itself could not be easier to use, read the instructions, spend a few minutes getting it configured, place it in the housing and start recording. Over seven months to create this video I checked the camera twice, downloaded the files and changed the batteries. With a Brinno camera it takes very little effort to record a long duration time lapse.

Brinno Time Lapse - Comparison - TLC200 Pro Frame Rates

2019 UPDATE: If you want an amazing new long term time lapse camera, please check out the Afidus ATL-200 at www.AfidusCam.com. We also have a web site dedicated to sales and support of time lapse cameras at www.TimeLapseCameras.com. Customer care is very important to us and we are here to ensure your time lapse project is a success.


This is the first in a series of comparisons to highlight the different settings, lenses and shooting scenarios using the Brinno TLC200 Pro time lapse camera.

Within the camera's Settings menu, the first option is Time Lapse Frame Rate. This is the video playback speed once you download the AVI file from the camera. Typically, I record all of my work at 30 frames per second (FPS) which gives the smoothest playback. If I want to slow down the playback it can be changed with video editing software.

However, you may not want to edit the video or simply want a slower playback to start with. In that case your options are 30, 20, 15, 10, 5 and 1 FPS. This is what each setting looks like on a windy day with clouds shot once every five seconds.

Brinno Time Lapse - TLC200 Pro Review

2019 UPDATE: If you want an amazing new long term time lapse camera, please check out the Afidus ATL-200 at www.AfidusCam.com. We also have a web site dedicated to sales and support of time lapse cameras at www.TimeLapseCameras.com. Customer care is very important to us and we are here to ensure your time lapse project is a success.


I have wanted to do my own review of the Brinno TLC200 Pro Time Lapse camera for some time. However, I just ran across this excellent and very detailed review by Lon Seidman.

In my opinion, this review is a great introduction to one of the time lapse cameras I use for many of my projects.

At the 4:30 mark Lon is critical of the preview screen, I do agree to some extent, but I personally feel the preview screen does what it is intended for, framing your shot. If you are having fun with the camera the screen is adequate. If I have a paying job, I typically view a quick test clip on a laptop just to make certain the video is framed and exposed correctly.

Additional notes from my perspective.

- The Micro USB port can be used to provide an external power supply to the camera.

- Depending on the shooting interval AA batteries can power the camera for a month or longer. My typical long term construction projects are shot with one frame every 10 or 15 minutes.

Overall this is good review for anyone looking into the Brinno TLC200 Pro.


Brinno Time Lapse - Weather Resistant Housing

2019 UPDATE: If you want an amazing new long term time lapse camera, please check out the Afidus ATL-200 at www.AfidusCam.com. We also have a web site dedicated to sales and support of time lapse cameras at www.TimeLapseCameras.com. Customer care is very important to us and we are here to ensure your time lapse project is a success.


Brinno-ATH-120-Weather-Resistant-Housing

The Brinno ATH110 or ATH120 weather resistant housings are a must have accessory if you plan a long term time lapse project. I have used both housings through rain and snow without any issues. The housings are not waterproof, however, they are extremely weather resistant and very well built.

The lens cover is very good and will not degrade your video. Unless, you leave the clear plastic protective film on which I have written about earlier.   

One of my favorite features of the housing is the fact you can mount it via the tripod hole and access the camera without disturbing the camera's position. This is crucial for long term projects when batteries need to be changed and you want to download a progression video. There are two clips on the side of the housing, unlatching these allows the front (and the camera) to swing away from the mount. The camera can be removed and replaced in the housing without removing the housing from the mount.

A number of people have asked what rain does to the lens covering. This piece of high grade plastic must have some miracle super coating on it as I have never had an issue with water spots. I have $1,000 professional camera lenses and if water evaporates on them I get spots. With the Brinno housing, water evaporates quickly and leaves no trace. To the right is a short sample of how rain disappears from the housing lens.

The housing would work in other applications where camera protection is necessary. From a dusty industrial setting to spray painting the interior of a house. Regardless of your situation, the housing offers piece of mind and a great mounting platform for your long term project.

Brinno Time Lapse - From Planting to Harvest

2019 UPDATE: If you want an amazing new long term time lapse camera, please check out the Afidus ATL-200 at www.AfidusCam.com. We also have a web site dedicated to sales and support of time lapse cameras at www.TimeLapseCameras.com. Customer care is very important to us and we are here to ensure your time lapse project is a success.


This is the start of a long term time lapse project, just for fun, to see what happens. I am documenting a corn field from planting, through the growing season and harvesting. In my last post I detailed the fabrication of the complex tree mount, shown below, along with a selfie from the running Brinno Camera.

Time-Lapse-Tree-Mount
Tree-Mount-Selfie

Here is a time lapse from the day of planting.

This was shot with the Brinno TLC200 f1.2 with one capture every five seconds. I altered the playback a little in iMovie, cutting out dead time and slowing down the tractor for a turn in the middle of the clip.

After the planting segment, I changed the batteries and switched the camera setting to capture one photo every hour. I will check on the camera very infrequently and let it run. Depending on my motivation, I will probably download a few progression clips.

The final movie will have 10-15 seconds from this clip, the growing and another 10-15 seconds of harvesting. Don't hold your breath for updates to this project, check back around Thanksgiving for the final video.

Brinno Time Lapse - A Look at My Mount Construction

2019 UPDATE: If you want an amazing new long term time lapse camera, please check out the Afidus ATL-200 at www.AfidusCam.com. We also have a web site dedicated to sales and support of time lapse cameras at www.TimeLapseCameras.com. Customer care is very important to us and we are here to ensure your time lapse project is a success.


I have written about the importance of sturdy mounts when doing a long term time lapse project. Few have any idea what I am willing to create in order to have a steady mount throughout the duration of a project.

I don't want any inadvertent camera movement, I don't want to worry about high winds or a bird taking care of business on my camera. I want to change batteries and download the videos without disturbing the position of the camera. Essentially I want a custom fabricated, welded, bolted, chunk of steel to hold my camera for six months or more.

Simpler mounts will work and I have talked of my successes with basic clamps. However, when I get into the 30 day or longer range I typically create a custom solution which works for me. My goal with this post is to show the amount of consideration that goes into the preparation for some of my projects, which I will detail in future posts.

Brinno-Construction-Cam-Time-Lapse-Mount

For now, onto the mounts. This past week I was starting two long term projects. One camera was to be mounted to a tree for seven months. The other was to be placed on top of a construction job site trailer for about five months. The owners of the tree did not want any major branch trimming and I could not bolt or clamp anything to the construction trailer. Here are the end results of my two mounts.

The first, is the construction cam trailer mount. The bracket is steel mounted to a board which will be detailed later. The bags are about 100 pounds of sand resting on the board. This camera sits about 15 feet above the work site and will be in place until the project's completion.

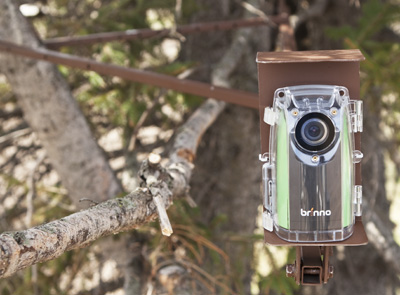
The other mount is in a large pine tree overlooking a farm field. This mount is by far my most complex and random creation. I did not want to go back and forth from the tree to fabrication, nor did I want to make changes onsite so I made this semi-adjustable. Keeping with the tree owner's request to not trim major branches, the main bar sticks out eight feet from the tree truck.

Brinno-Farm-Time-Lapse-Tree-Mount2
Brinno-Farm-Time-Lapse-Tree-Mount.jpg

Here is an overview of how I make these, not a step by step tutorial, just something to give you an idea of what I do to create them. I did all this with metal stock in my garage, however all of the components could be found at Lowe's, Home Depot, Menard's, Fleet Farm, etc. If you don't want to jump in this deep or have the tools to do so, I can envision something built well from wood or even a repurposed bread loaf pan. The point here is to make sure your long term camera moves as little as possible.

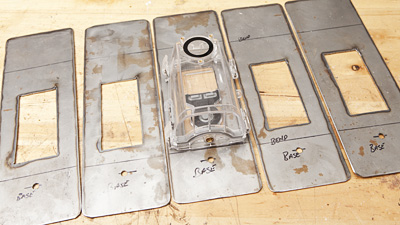
I needed to build two mounts, since the camera bracket is the same for every mount and the most time consuming to create I decided to build five brackets. Why five? Well the piece of steel I had laying around was large enough to allow for five. Two were going up, giving me three spares for other projects.

Brinno-Time-Lapse-Mount-Layout

The first step is laying out the mount cut lines on the steel. The steel is 1/16th of an inch thick, sturdy, yet quite easy to work with mild force.

Brinno-Mount-Plasma-Cutter

Next, I used a plasma cutter to cut the steel into smaller strips and a hole in the back of each so the camera controls can be accessed and LCD screen visible. Most people probably don't have a plasma cutter sitting around. An angle grinder with a cutting wheel would work. The center could be cut with holes drilled at each corner and a hacksaw used to cut the sides. But the plasma cutter was my tool of choice and it slices through this thin stuff with ease.


Brinno-Mount-Blanks

Here are the mount blanks after cutting and grinding the corners to remove sharp edges. I drilled a hole in each base for a mounting screw which will go into the weather resistant housing. I also drilled two small holes along the left and right edges for a cable ties to run through the side housing holes and through the steel.

Next is bending the blanks into the final form. A large vise and hammer took care of this task without much effort.

Next is bending the blanks into the final form. A large vise and hammer took care of this task without much effort.

Here are the mounts after cutting and bending.

Here are the mounts after cutting and bending.

Brinno-Mount-Welding.jpg

I weld tabs on the bases which will bolt, typically to another bar, for the mount anchor. Without a welder I would probably use angle iron and drill and bolt it to the base.

Below left is the finished construction trailer roof mount. The camera bracket is adjustable for tilt. The post is welded to a drilled plate which is mounted to a wood board. In the first picture the sandbags are over the wood and everything is painted to prevent rust and rot.

The last image is my complex tree mount, before painting, which admittedly, grew into something much more complex than I had planned.  At this length the wind would cause unwanted camera movement. I built this mount so the cross braces could either be bolted to each other or to the tree which is what I did with the final mounting. The large angle bracket is attached with two lag screws and each cross bar have one lag screw into the tree.

Finished construction trailer mount.

Finished construction trailer mount.

Tree mount before painting.

Tree mount before painting.

Brinno Time Lapse - Blurry Videos Using Weather Resistant Housing

2019 UPDATE: If you want an amazing new long term time lapse camera, please check out the Afidus ATL-200 at www.AfidusCam.com. We also have a web site dedicated to sales and support of time lapse cameras at www.TimeLapseCameras.com. Customer care is very important to us and we are here to ensure your time lapse project is a success.


I am only writing about this because the situation has happened to me. I had a big project with two time lapse cameras running, the dismantling of a road train trailer and delivery of a very large transformer to a new sub station. One camera, I unboxed on site and hastily placed in an ATH110 Weather Proof housing to mount on a ladder on a very cold winter day.

When I viewed the videos, the ladder mounted camera clip (above) was soft and blurry and unusable for my project. I first thought maybe it was the extreme cold as this camera was stationary all day while the other camera moved around and was warmed up occasionally during breaks in the action. However, I have had cameras function fine in extreme cold before.

A brand new weather resistant housing with protective plastic over the lens. Without knowing the plastic is there you will probably miss it and have poor video results.

A brand new weather resistant housing with protective plastic over the lens. Without knowing the plastic is there you will probably miss it and have poor video results.

The camera was good, I had used it on other projects so my next thought was the housing. There must have been some residue, finger oil or something obscuring the lens element. I checked and could not find anything so I left the issue unsolved which bothered me.

Still bothering me, I checked again and on the third time I discovered it... There was a very thin layer of protective cling plastic over the lens. I don't recall if I quickly pulled it off on previous housings, it just fell off or wasn't there in the first place. However, this time it was there and it wrecked one video.

Removal of the plastic from the housing lens. Do this before you start shooting.

Removal of the plastic from the housing lens. Do this before you start shooting.

This plastic is hard to notice and there is no mention of it in the instruction pamphlet. I wish Brinno would change the color, add a sticker to it or something to alert users to remove the plastic.

In short, check for the plastic, if you don't think it's there check again. Look carefully for the pull tab covering the brass piece at the bottom of the lens.

Peel the plastic off and the housing will perform very well with no noticeable difference between using the housing and not.


Here is video shot on the same day from the other camera without plastic obscuring the lens.


Brinno Time Lapse - House Construction Cam First Download

2019 UPDATE: If you want an amazing new long term time lapse construction camera, please check out the Afidus ATL-200 at www.AfidusCam.com. We also have a web site dedicated to sales and support of time lapse cameras at www.TimeLapseCameras.com. Customer care is very important to us and we are here to ensure your time lapse project is a success.


Here is the first download from my current house construction time lapse project. This was quickly edited to 15 seconds as a short clip to show on Instagram. The final result will be the complete construction from start to finish. I downloaded this after a few weeks of work to see if my concerns about the mount, previously written about in my Breaking Rule 1 post, were as bad as I anticipated.

The mount is not as bad as I thought it would be. There is some image shifting but given I had no other mounting option, I will continue with this project as an example of mounting a camera to a less than ideal structure. There is some odd vertical movement which should be impossible and I cannot logically explain. My best guess is the fiberglass composite street light pole and the ground expand slightly throughout the course of the day, adding to the pole height. 

For this video the Brinno TLC 200 f/1.2 camera and housing are clamped to a street light with a Delkin Fat Gecko. I planned on fabricating a sturdier mount and using the Fat Gecko as a temporary solution. When I had pole vibration concerns, I thought this first download would be wasted footage. Now, I have decided to keep this camera in place and I will also leave the Fat Geko, which is working very well.

These two images give you a better idea of the mount from the camera's perspective. The Fat Geko works well on flat surfaces. My version, of the clamp, has two notches which grip the trim on the light housing perfectly. The black string is added as a safety measure to prevent the camera from falling to the ground should the clamp fail. The white on the camera is a note inside the housing. Although this camera was placed with permission from the utility company, the note provides contact information in case a utility worker does not know about the installation.

The shooting specs for this video are one capture every 10 minutes at 30 FPS. The video above does not modify these settings. All of the dead time was edited out in iMovie and it was tough to squeeze it into the 15 second Instagram format. The final movie will probably be around a minute long and I may choose to slow down the pace a little.

This house should be complete by August and I feel comfortable leaving this camera untouched for a month or so. I will have an update or two between now and the house's completion.

Brinno Time Lapse - File Size and Split Files

2019 UPDATE: If you want an amazing new long term time lapse camera, please check out the Afidus ATL-200 at www.AfidusCam.com. We also have a web site dedicated to sales and support of time lapse cameras at www.TimeLapseCameras.com. Customer care is very important to us and we are here to ensure your time lapse project is a success.


Questions pop up from time to time regarding SD Card format, file sizes and what happens when a file gets too big. A few people have expressed concern the camera will shut off, or stop recording once a maximum file size is reached.

My experience with the Brino TLC200 f/1.2 and Pro is the camera will not stop recording until either the card fills completely (32GB max) or the batteries run out.

A Brinno TLC200 Pro, folder screen shot, of a single video recorded in ASAP mode for about 48 hours. At 4.29 GB the maximum file size is reached and a new file is started.

A Brinno TLC200 Pro, folder screen shot, of a single video recorded in ASAP mode for about 48 hours. At 4.29 GB the maximum file size is reached and a new file is started.

SD cards are typically formatted as FAT 32, which is simply a standard file system compatible with both PCs and Macs. The maximum single file size allowed within FAT 32 is 4.29 GB. Once the recorded AVI file reaches 4.29 GB another file starts.

The camera does not stop recording and nothing changes when a new file is started other than a new file appearing on the card.

4.29 GB is a pretty good size time lapse movie and your files won't split unless you are shooting with short durations or over a long period of time. For reference, a movie shot with one capture every 15 minutes, 24 hours per day, for one month would be about 1 GB and around 1 minute 30 seconds long.

Now the question is what to do with the files. If you want to edit your movie, eliminating some boring content, add some music, etc. using a program like iMovie makes this simple work. In iMovie you can combine, edit and create a polished version of your movie. iMovie is a great simple program for editing time lapses and offers the ability to explore more complex editing.  FinalCut, Premier and others work equally well too, even better if you know what you are doing.

If you just want to combine your movie for a simple final result, freeware is available to do this basic task. A search for "AVI Joiner"  will provide you with a few options.

BanksPhotos offers a time lapse editing service. If you want a professional feel for your video and you lack the knowledge or skills to do it yourself contact us today and we'll discuss your editing needs.

Brinno Time Lapse - Breaking Rule 1

2019 UPDATE: If you want an amazing new long term time lapse camera, please check out the Afidus ATL-200 at www.AfidusCam.com. We also have a web site dedicated to sales and support of time lapse cameras at www.TimeLapseCameras.com. Customer care is very important to us and we are here to ensure your time lapse project is a success.


A few days ago I posted about how important it is to have a sturdy mount for your long term time lapse projects. I even called this Rule 1 and rambled on about how this is the only rule you need to follow, the rest is up to you. Well, I broke Rule 1 and mounted a time lapse camera in a less than ideal location and now it will be a few months before I find out how bad this decision was.

A local builder contacted me about doing a time lapse house construction project form start to finish. My first task was to scout the location which turned out great. It was going to be a nice home with a south facing front, as an added bonus there was a street light, across the street from the house which would serve as a perfect mount for a camera, or so I thought.

I do a lot of work with our local utility company so I contacted them for permission to use the light. Permission granted, now I was going to construct a sturdy mount for the camera. I got a call from the builder the morning digging started which was a week earlier than originally planned. I didn't start on my custom mount but I had to do something quick, the custom mount could wait. I grabbed a few clamps and this is what I rigged up.

At the time of installation I immediately noticed how unstable the light pole was. The pole moves with a very slight touch. I would never have thought the pole would move as much as it did, sure a strong wind may cause some problems and I could accept that. I did not expect one finger would make the pole move. The LED light does not weigh much so the pole does not need to be as sturdy as a conventional street light.

I had no choice, the digging was starting across the street and the light pole was the only option. Using a Fat Geko clamp I positioned the camera. I added a note in the camera housing stating the camera was placed with permission in case an uninformed utility worker decided it should come down. I also attached a nylon cord to prevent the camera from hitting the ground should the clamp give way.

I have downloaded the first week of video and yep it shakes. However, the builder and others still like it so the camera is staying put. I will post a sample clip here once I have a bit more action to show what not to do with your long term time lapse.